
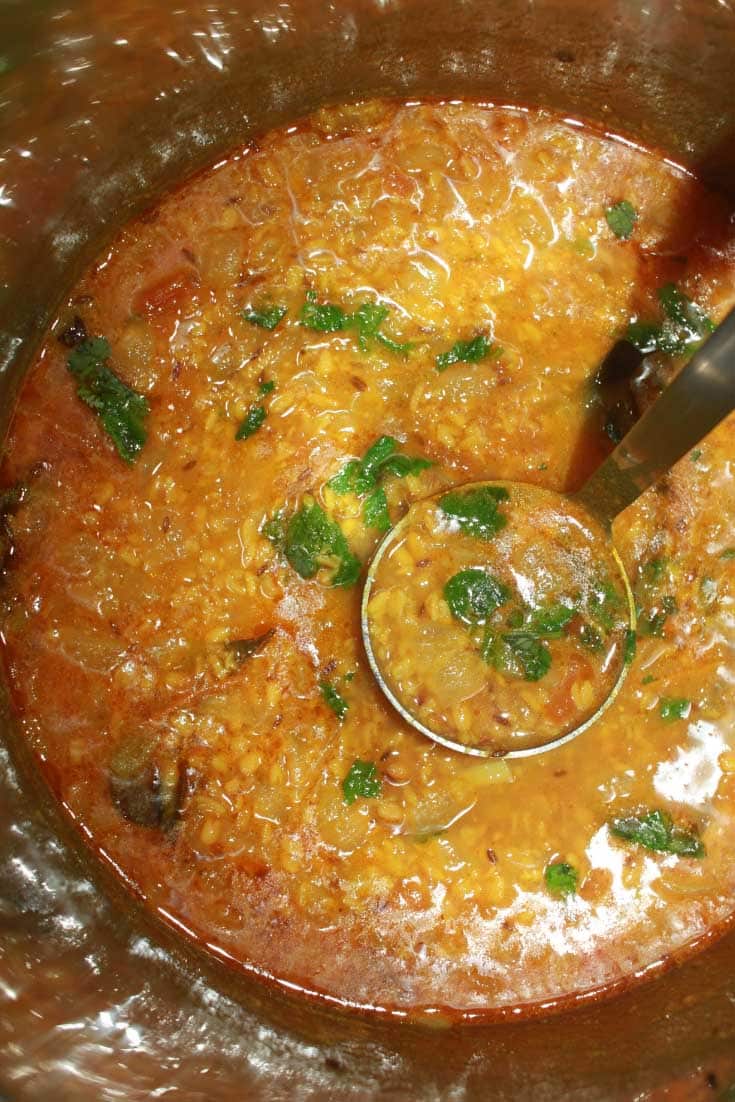
Instant pot moong dal fry uses yellow split moong dal/mung beans (without skin) which is made into a dal curry flavored with onions, tomatoes and spices.
This Indian style moong dal fry is also known as moong dal tadka in North India (as we make a seasoning or tempering known as tadka to flavor the dish) and also simply known as parippu curry in South India. It is a simple, easy and delicious dal fry which goes great with rice for lunch or dinner. You may also enjoy this moong dal fry with Indian flatbread like chapathi, poori etc if you wish, though this is popularly enjoyed with rice as an everyday dish.

Yellow moong dal is the skin removed form of mung beans, with skin its known as green mung beans or green moong dal. You can learn how to cook green mung beans here. See how to make simple and easy green moong dal curry in instant pot here. You can also make easy, delicious green moong dal soup using moong dal or mung beans. The most popular kind of dal fry in Indian households uses toor dal or yellow pigeon peas and also other kinds of dals which takes more time to cook. But this yellow moong dal is so easy to cook as the dal is quite small and cooks really fast. Moong dal goes from cooked to over cooked (still very delicious) very fast and so if you want to retain the dal in its form you shouldn't over cook the dal. I have only used 4 minutes of cooking time in high pressure with 2 cups of water for ¾ cup of moong dal. Adding cilantro leaves to the cooked dal is something that we do after the dal is prepared using the instant pot, as we use the coriander leaves for garnishing. By adding the leaves at the end, you can retain the color of the leave. I also added little water later on and simmer for a couple of minutes in the instant pot to adjust the amount of gravy, but this is totally optional and it is based on your preference on how you want the dal fry.
If you prefer a very soft consistency which gets dissolved in your dal curry, you can add one more cup for water and cook for another 3 more minutes. For this moong dal fry recipe, I think the cooking time of 4 minutes with 2 cups of water is just perfect with ¾ cup of moong dal. The consistency of the dal fry is your preference though, which you can easily adjust with minor variations in the amount of water and cooking time as I have mentioned above. You can also simmer the dal with additional water after you have prepared the dal, which gives you more control over how the texture of the dal fry should be like.


As I mentioned earlier, adding cilantro leaves (coriander leaves) is something that we do at the end of the preparation for garnishing the dal. The addition of coriander leaves makes the yellow moong dal more flavorful and more delicious!


So here is how we prepare this easy moong dal tadka in instant pot following this easy instant pot moog dal fry recipe.
how to make moong dal fry in instant pot?
We use the following ingredients to make super easy and delicious moong dal fry or tadka in instant pot.
ingredients used to make moong dal fry
- ¾ cup yellow split moong dal yellow split mung beans
- 1 large onion
- 1 tomato
- 2 cloves garlic peeled and crushed
- 2 cups water for cooking
- 1 cup extra water or more for gravy (optional)
- ¼ salt adjust as needed
- 1 tablespoon ghee optional
- ½ teaspoon turmeric powder
- ½ teaspoon red chili powder
- 2 bay leaves
- 2 small cinnamon sticks
- 1 string curry leaves optional
For seasoning
- 2 tablespoons oil
- 1 teaspoon cumin seeds
For garnishing
- 2 tablespoons coriander leaves chopped (cilantro leaves)
step by step instructions
- Wash and peel the onion, cut the onions into small pieces, keep the chopped onions aside.
- Wash and chop the tomatoes also into small pieces, keep this aside separately from the onions.
- Add oil to the inner pot, press the saute function, adjust to low and add the cumin seeds.
- When the cumin seeds is lightly fried, add the bay leaves and cinnamon sticks too and lightly fry which takes a few more seconds.
- Add the garlic and saute for another one minute.
- Add the chopped onions and little salt, saute for another 4 to 5 minutes until the onions are lightly sauteed.
- If the heat is low, you can always adjust the settings by pressing the 'keep warm' button, then press the saute button again and press adjust to change the level from low to medium.
- Once the onions are lightly sauteed, add the moong dal and lightly fry for another 2 to 3 minutes until the raw smell goes away.
- If needed you may add a little more oil and fry the contents.
- The moong dal will have a tendency to stick to the bottom of the pot, so you need a good spatula to stir the contents frequently (and scrape the bottom of the pot if necessary) to avoid the dal sticking to the pot. If the pot gets too hot, adjust the heat to low in saute mode again.
- Add the chopped tomatoes and lightly fry for another 2 to 3 minutes.
Add the spice powders and mix well, stir fry for about 2 more minutes in low heat until the raw smell of spices go away. Press the ‘keep warm/cancel’ button to stop the saute function. - Add the 2 cups of water, ghee (if using, you may avoid ghee if you want to keep this vegan) and enough salt and mix everything well.
- Make sure there is no dal stuck to the bottom of the pot to avoid any burning of dal.
- Close the pot with lid in sealing position and press manual, cook in high pressure for 4 minutes.
- It took few minutes to come to pressure and start the cooking, so you will need to wait until the cooking is done.
- Once the cooking is done, the pot will beep and you can press the 'keep warm/cancel' button. Wait for the instant pot to naturally release all pressure.
- If needed, you can do a manual release (by turning the lid to venting position slowly to release the remaining pressure) after an NPR (natural pressure release) of about 10 minutes.
- Once the pressure is all released, open the pot by carefully turning the lid to venting position.
- Gently mash the contents using a spoon and check the salt, if needed, you may add a little more salt.
- To make little more gravy for the dal fry and to make the dal a little more soft (Optional), add the remaining one cup of water and press the saute function, adjust to normal and simmer for another 2 more minutes or until desired thickness is reached.
- Stir well, garnish with cilantro leaves (coriander leaves), gently mix in and serve the delicious hot dal with rice for lunch or dinner.
- You can also add an extra spoon of ghee with the dal when serving with rice, which will make the dal and rice even more delicious!
Notes: The dal may have a tendency to thicken as it sits for a while.
If needed you may add more water as needed and you can always reheat the contents by using the saute function and simmering for a couple of minutes.
For extra soft dal which, you can use 3 cups of water for cooking and cook for another 2 to 3 minutes of time (so total time of 6 minutes) if you prefer very soft dal.
Below you can get the recipe for instant pot moong dal fry or dal tadka in detail.
Instant Pot Yellow Moong Dal Fry
Ingredients
Equipment
Method
- Wash and peel the onion, cut the onions into small pieces, keep the chopped onions aside.
- Wash and chop the tomatoes also into small pieces, keep this aside separately from the onions.
- Add oil to the inner pot, press the saute function, adjust to low and add the cumin seeds.
- When the cumin seeds is lightly fried, add the bay leaves and cinnamon sticks too and lightly fry which takes a few more seconds.
- Add the garlic and saute for another one minute.
- Add the chopped onions and little salt, saute for another 4 to 5 minutes until the onions are lightly sauteed. If the heat is low, you can always adjust the settings by pressing the 'keep warm' button, then press the saute button again and press adjust to change the level from low to medium.
- Once the onions are lightly sauteed, add the moong dal and lightly fry for another 2 to 3 minutes until the raw smell goes away. If needed you may add a little more oil and fry the contents. The moong dal will have a tendency to stick to the bottom of the pot, so you need a good spatula to stir the contents frequently (and scrape the bottom of the pot if necessary) to avoid the dal sticking to the pot. If the pot gets too hot, adjust the heat to low in saute mode again.
- Add the chopped tomatoes and lightly fry for another 2 to 3 minutes.
- Add the spice powders and mix well, stir fry for about 2 more minutes in low heat until the raw smell of spices go away. Press the 'keep warm/cancel' button to stop the saute function.
- Add the 2 cups of water, ghee (if using, you may avoid ghee if you want to keep this vegan) and enough salt and mix everything well. Make sure there is no dal stuck to the bottom of the pot to avoid any burning of dal.
- Close the pot with lid in sealing position and press manual, cook in high pressure for 4 minutes. It took few minutes to come to pressure and start the cooking, so you will need to wait until the cooking is done.
- Once the cooking is done, the pot will beep and you can press the 'keep warm/cancel' button. Wait for the instant pot to naturally release all pressure.If needed, you can do a manual release (by turning the lid to venting position slowly to release the remaining pressure) after an NPR (natural pressure release) of about 10 minutes.
- Once the pressure is all released, open the pot by carefully turning the lid to venting position.
- Gently mash the contents using a spoon and check the salt, if needed, you may add a little more salt.
- To make little more gravy for the dal fry and to make the dal a little more soft (Optional), add the remaining one cup of water and press the saute function, adjust to normal and simmer for another 2 more minutes or until desired thickness is reached.
- Stir well, garnish with cilantro leaves (coriander leaves), gently mix in and serve the delicious hot dal with rice for lunch or dinner. You can also add an extra spoon of ghee with the dal when serving with rice, which will make the dal and rice even more delicious!

AZ Red says
Hello Recipe Garden!
I made this today with only a few alterations. We eat some sort of beans-curry-on-rice almost every day for lunch, and this one was stand-out with the cinnamon flavor! I added a bit of yellow curry paste (love that lemongrass) and ginger and garam masala but the cinnamon just made the dish. What a great idea! Thanks for posting and expanding my idea-bank for new ways to do Stuff-On-Rice! This recipe made the bookmarks!
Recipe Garden says
Thank you so much for the feedback! I am so glad to hear you enjoyed this moong dal fry recipe with added cinnamon flavor! I agree, cinnamon adds much flavor & it stands out. Also adding yellow curry paste and spices sounds great! It's always great to try new variations. Thank you again for your valuable feedback 🙂 Have a great day!